Studer-A810
Studer A810 SerialRemoteControl
Beta version
(limited functionality, all transport and channel mode buttons work, but there is no feedback from recorder for information such as tape counter or channel status).
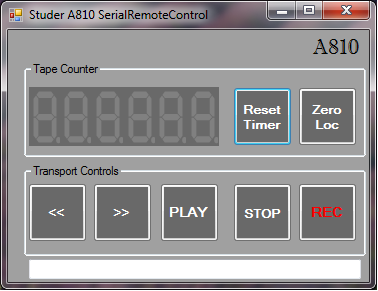
Standard View
Expanded view (window can be resized to show or not show the Channel buttons).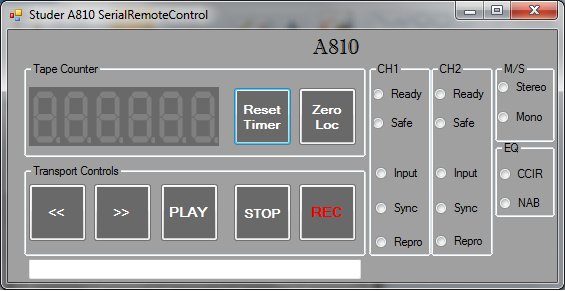
System requirements:
- Windows7 or newer operating system, with .NET Framework 4.0
- RS232 Communications port (USB - RS232 converter cable works fine) with a suitable interface cable to Studer Serial remote connection.
- Studer A810 equipped with Serial Remote Controller card 1.810.751.00 / .81 / .82
- May also work with other Studer machines such as C27x A807 A812 A816 A820-2CH.
The SerialRemoteControl program uses a subset of the protocol as described in "RS232_ASCII_Protocol_Specs_2CH.pdf" that can be found on the Studer ftp site. Basic transport commands (PLAY / STOP / FFWD / REW / REC) are common to above Studer models so at least these should work.
- SerialRemoteControl-beta001.zip (download size just 12kB)
Scanned by virusscan.jotti.org and found to be clean
The program requires the Microsoft .NET Framework 4.0 to be installed on your system. You can download it at from here
<add key="commport" value="COM2" />
<add key="baudrate" value="9600" />
Studer A810 CalibrationTool
Utility written to aid Audio Calibration of a Studer A810 tape machine (and perhaps other A8xx machines).
# 30IPS CCIR 355nWb/m (playback calibrated, recording not calibrated)### CH1 ####
SAP 1 0 28
SAP 1 1 46
SAP 1 2 76
SAP 1 3 26
SAP 1 4 49
SAP 1 5 1D
SAP 1 6 39
SAP 1 7 DE
### CH2 ####
SAP 2 0 2C
SAP 2 1 49
SAP 2 2 76
SAP 2 3 26
SAP 2 4 48
SAP 2 5 1F
SAP 2 6 39
SAP 2 7 D5
 GUI of version b004
 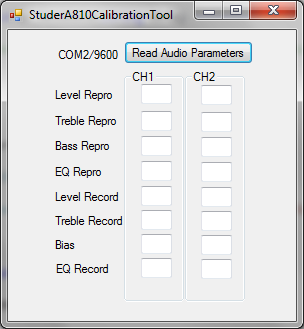 User interface of first beta versions
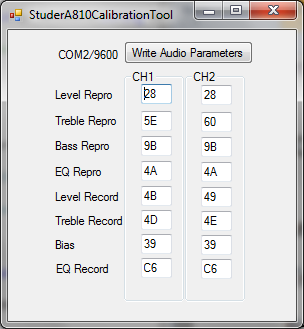
- Latest version:
StuderA810CalibrationTool-beta004.zip (download size just 8kB) - Older versions:
StuderA810CalibrationTool-beta003.zip
StuderA810CalibrationTool-beta002.zip
Scanned by virusscan.jotti.org and found to be clean
Installation / Configuration:
See above
Usage:
Connect the Studer serial interface to your computer/laptop's rs232 port (a USB to RS232 converter cable works fine). A conversion cable is required as the connection to the studer serial port is not 1:1. See the A8xx Operating manual.
Power up the tape machine. A8xx's serial port should be setup to 9600baud, no echo.
Start the CalibrationTool. If the commport is not setup correctly, an error is displayed; you must edit the .config file (with notepad) and change the commport name to the one you have, save the file, and restart the program.
If no commport error appears, you can press the button "Read Audio Parameters". If all is wired-up correctly, the current parameter values from the machine will be displayed in their respective fields.
Copy these values to clipboard and paste them in a text editor (e.g. notepad). Now you have a backup of the current parameters (for this selection of Tape-speed, EQ and Tape A/B setting).
Now you can start tweaking the audio parameters of each channel using the up/down buttons. On each press, the updated parameter value is sent to the tape machine. Use the proper aligment procedure with cal tape etc. If all parameters are set to your liking and are sure you can overwrite the original parameters, press the button "Write Audio Parameters". If unsure or have messed-up, just exit the program by pressing [X] ) and power-cycle your tape machine and everything is back to original settings.
ChangeLog:
beta001 - Initial release.
beta002 - Improve user experience during calibration work: When editing values, send incremental updates to recorder memory on exit of each field (by sending "PAP n m xx" commands to the machine). These values are only temporary. The parameters are stored in non-volatile memory only when the "Write Audio Parameters" button is pressed.
beta003 - Changed value entry boxes by numeric Up/Down controls. Makes it easier to tweak the parameters without having to type numbers.
beta004 - Added Copy to Clipboard. Can be used for backing up audio parameters. You can then paste into a text application of your choice and write comment about the tape and operating parameters for this parameter set.
Feedback / Questions:
The author of this program, pe9ghz, can be reached via the Tapeheads forum.